

Student Resources
Please contact your teacher for access to additional materials that are pertinent to your class.
LIBERTYVILLE HIGH SCHOOL

Behind the Wheel Lessons
-
Starting, Stopping, Turns & Backing
-
Citys Driving, Intro to Lane Changing & Hill Parking
-
Turnabouts – 5 types
-
Parking - Angled, Perpendicular & Parallel
-
Teacher Evaluation
-
Lane Changing & Rural Driving
-
Destination Drive & Emergency Procedures
-
Limited Access Highway / Expressway Driving
-
Review for the CDTP - State Driving Exam
-
State Driving Test - CDTP
DRIVING GUIDE
In order for the Driver Education Program to have maximum carryover value, we ask parents to help strengthen their son’s or daughter’s driving skills by following the techniques in this notebook. Based on the example you set, we realize that you have the most significant impact in the development of your sons or daughter’s attitude toward driving. Additional driving experience given under conditions that are similar to the practice conditions at school will help beginners greatly. We suggest an additional 1-2 hours of practice per week driven in short time blocks. The State of Illinois now requires that students log an additional 50 hours of practice with a licensed adult over 21 before they can obtain a license at the Department of Motor Vehicles (DMV).
We feel this is the most important course your son or daughter will have in the high school. We would like to cooperate with you to make this course as meaningful and significant as possible. We encourage you to call if you have any questions.
Student Driver:
You’ll become a safe driver by learning and practicing all laws, techniques and skills throughout the semester. This course is designed to help teach you the responsibilities of driving so you can become a lifelong driver with a clean record - no tickets and no accidents.
The following are the characteristics that student drivers are to develop:
-
Safe driving skills
-
Acceptance of responsibility
-
Foresight
-
Good driving judgment
-
Attention to task (defensive driving)
-
Good citizenship
Permit Policy
All drivers must present their permit to the classroom teacher prior to their first day of driving. The receipt is not acceptable. All students in driver education must bring proper shoes and clothing with them every time they are scheduled to be in the car, whether they are scheduled to drive or not. After 2 violations of our policy, the student will not be illegible for our by-pass program, and the semester grade for driving will be lowered by 1 letter grade for every subsequent violation.
Driving is the biggest step most of you students will make on the road to adulthood. You will retain the “privilege” of driving only as long as you handle the vehicle in an adult manner.
Sincerely,
Driver Education Staff
Libertyville High School
847-327- 7071
Parent/Guardian Signature __________________________________________________ Date__________________
Instrument Panel
A driver should know what each control on the vehicle they are driving is for and how to operate it correctly. We will start at the top and progress to the floor board.
Sun Visor – Attached above windshield on front seats of driver and passenger side.
-
Protects the eyes from sun glare, oncoming headlights.
-
Adjust perpendicular to the floor board or forward.
Rearview Mirror – Attached in the middle of the windshield.
-
You should be able to see most everything out the rear windshield of the vehicle.
-
Adjust so the only physical movement required will be to move your eyes.
Systems (Red Lights) – Warning lights
-
Lubrication (oil) - If the light stays on for more than 5 seconds, pull off the road and turn car off.
-
Coolant (antifreeze/water) - Drive no more than a couple blocks or a half mile.
-
Electrical (alternator) - Can keep driving to service station or home (may not damage the engine).
-
Seat Belt - Light will stay on until driver fastens seat belt.
-
Air Bag - Light should go out after a couple seconds if bag is functional.
Ventilation – 3 controls usually
-
Fan - Controls the velocity of the air coming into the car.
-
Temperature Control - Determines how hot or cool the air in the car is.
-
Selector lever - Has the air conditioning, heater, defrost and vents.
Note: When air is not being circulated or circulated fast enough, condensation may form on the inside of the windows. This results because the air inside is warm and when cooled, it can’t hold as much water vapor so it condenses on the cold surface of the window.
Light Switch – Location varies, usually located on the far left or the end of the turn signal. We use our day, running lights to enable other drives to see us better.
Turn Signal – It is located on the left side of the steering wheel. You lift up for right and down for left.
Windshield Wipers/Washers – Location varies, usually located on right side of steering wheel.
Horn – Location can vary, usually located in the middle of the steering wheel.
Steering Wheel - Center steer can usually be determined by the shape of the wheel.
-
Turning – we use hand over hand steering
-
Grip the wheel do not “Palm” the wheel.
-
Palms down always (this keeps the hands on the outside of the wheel for better control).
-
-
Hand position – 10 - 2 or 9 - 3.
Ignition Switch – Usually located on the right side of the steering column or dash board.
-
Steering lock – the wheel cannot be turned when the key is removed.
-
Transmission lock – the gear selector lever is locked in “park”.
-
Ignition lock – cannot engage the starter with key removed.
Gear Selector Lever – located on the right side of steering wheel or in the middle console. Vehicles will only start in park or neutral.
Emergency Flashers – Location varies, usually on the right side of steering wheel, middle of dashboard.
Accelerator – Pedal on the right side of the floor board.
Brake – Pedal to the left of the accelerator.
Note: Accelerator and brake should be controlled with the ball of the foot. Driver should start with right foot braking (in time left foot braking can be learned).
Clutch – Pedal will be located ONLY on stick shift vehicles (manual transmission) left of the brake.
Emergency Brake – Will either be located on the far left (small pedal, left of others) on the floor board or a hand lever located between the front seats.
The following techniques and maneuvers are to be studied and memorized.
-
Following distance – Intervals of 3 & 4 seconds minimum, between you and other vehicles.
-
Rule for rear view mirror – Should be checked every 7-10 seconds.
-
Rule for stopping behind another vehicle – Should be able to see the rear wheels of vehicle in front.
Pre-Drive Procedures – Follow the below procedures every time you approach/enter your vehicle.
-
Check around vehicle (toys, tires, bikes, children, pets..).
-
Shut and lock doors.
-
Key in the ignition.
-
Adjust seat (comfortable but in an alert position).
-
Adjust rearview and side mirrors (should be adjusted with little head movement).
-
Adjust steering wheel if needed (lever below steering column).
-
Fasten seatbelt (should be snug).
-
Make sure ALL passengers have seatbelts on.
Starting the Engine – Should be done only after you have completed the steps above.
-
Turn the key or fab to the right or push the ignition button (release once engine starts).
-
Check instrument panel for any warning lights.
1st Behind the Wheel Lesson
Objectives
-
Become familiar with the cars instruments.
-
Pre-driving checks.
-
Pulling to and away from the curb.
-
Starting and stopping procedures.
-
Right and left turns and backing in a straight line.
Leaving the Curb
-
Right foot on brake.
-
Shift to “D”.
-
Signal to the left (communicating with others).
-
Check mirrors (rearview & side).
-
Check over left shoulder (blind spot).
-
Release brake, accelerate into proper lane and cancel signal.
Pulling to the Curb
-
Check mirrors.
-
Signal to the right.
-
Decelerate (foot off brake pedal).
-
Begin braking (light pressure with right foot).
-
Pull over 6 -12” of the curb.
-
Come to a complete stop.
-
Shift to “P”.
-
Release seat belt
-
Remove key
-
Look, lever, leave (check for traffic, unlock doors, leave vehicle).
Left Turns
-
Legal (look for a no left turn or one way sign).
-
Signal (100 feet in urban areas, 200 feet in rural areas and on expressways).
-
Check mirrors.
-
Decelerate and brake lightly (all braking should be done before the turn).
-
Drift to the left side of the lane.
-
Visual checks (left, right, ahead left again).
-
Yield if necessary.
-
Turn when the nose of the car is at the center of the street.
-
Accelerate lightly as you unwind the wheel.
-
Aim high in steering.
Right Turns
-
Legal (look for a no left turn or one way sign).
-
Signal (100 feet in urban areas, 200 feet in rural areas and on expressways).
-
Check mirrors.
-
Decelerate and brake lightly (all braking should be done before the turn).
-
Drift toward the curb (2-3 feet from curb).
-
Visual checks (left, right, ahead, left again).
-
Yield if necessary.
-
Turn with the curve of the curb.
-
Accelerate lightly as you unwind the wheel.
-
Aim high in steering.
Straight Backing
-
Right foot on brake, shift to “R”.
-
Left hand at 12:00 (steering wheel must be centered to begin).
-
Right arm on back of front seat to open right shoulder.
-
Look out rear window (except for the occasional glance forward or to the left side).
-
Look back until the car comes to a complete stop.
.
Backing – Left or Right
-
Look over left or right shoulder and use hand over hand steering (if needed).
-
Turn the steering wheel in the direction you desire the back end to go.
-
Make visual checks (keep looking in all directions).
-
Foot should be on brake with light pressure (may need to accelerate at times).
-
Unwind steering wheel to straight position prior to stopping.
Note: Turn the wheel in the direction you want the car to go (same as going forward).
2nd Behind the Wheel Lesson
Objectives
-
Review previous lesson.
-
Backing left or right around a cul-de-sac.
-
City driving (driving through downtown Libertyville).
-
Introduction to Lane Changing (any 4 lane road – Butterfield, Routes 137, 21, 60 etc.).
City Driving
-
Scan area for signs, signals, pedestrians, vehicles etc.
-
Drive slowly and cautiously.
-
Speed should not exceed 25 mph.
-
Expect the unexpected.
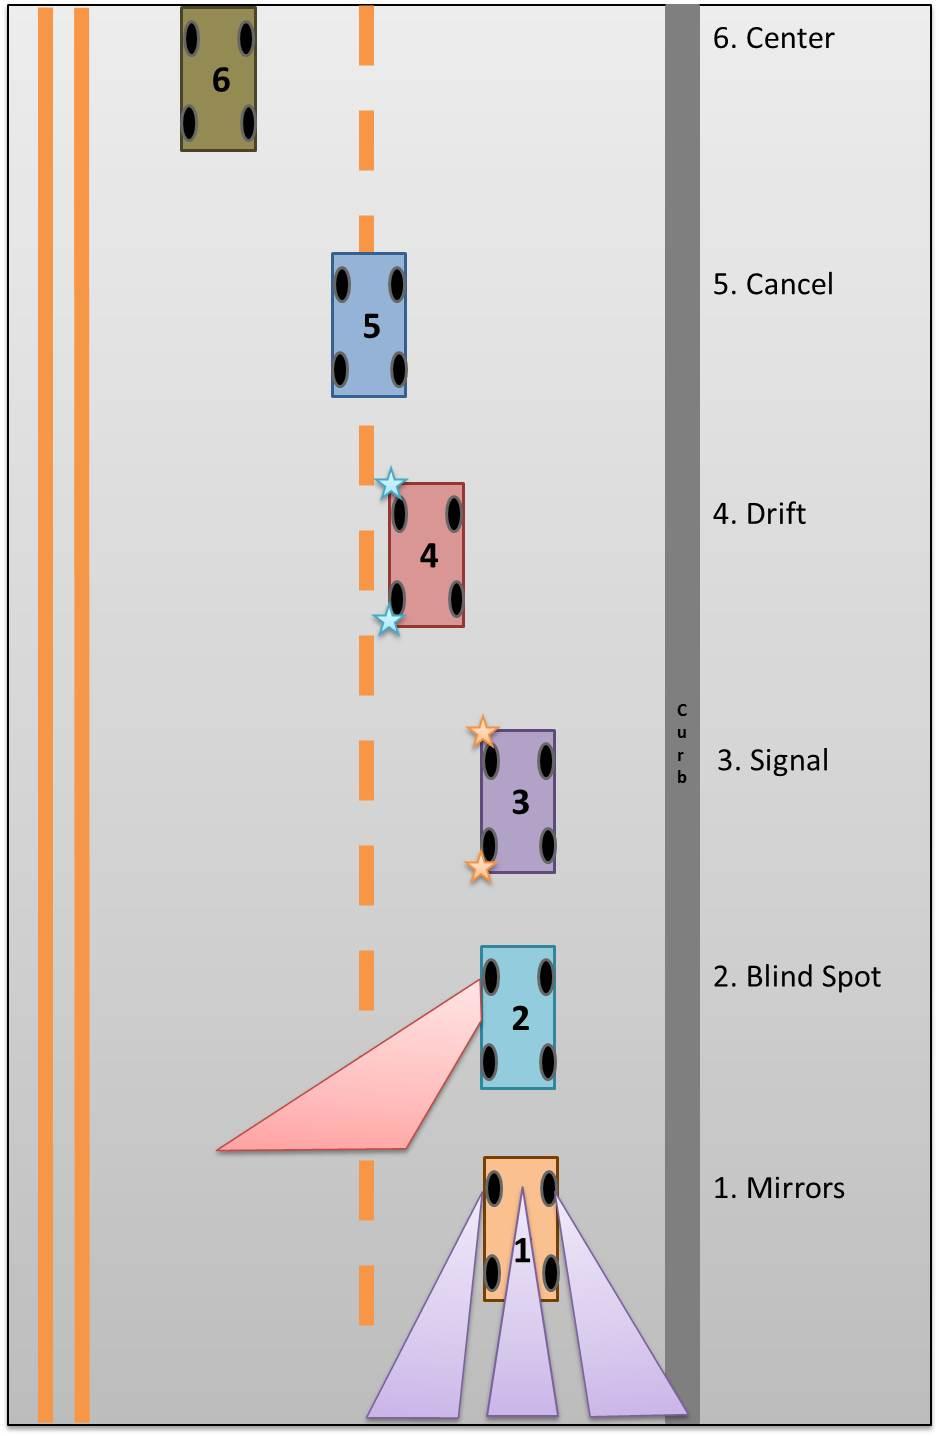
Lane Changing
-
Check rear view and side “Mirrors” (is anyone coming up from behind).
-
Check your “Blind Spot” (direction you intend to move).
-
“Signal” your intention (communicate with vehicles behind).
-
“Drift” into proper lane (steering wheel should have slight movement).
-
“Cancel” signal when vehicle is halfway into the desired lane.
-
“Center” vehicle in correct lane (maintain legal speed).
Note: Students may have to accelerate or decelerate in order to make safe lane change.
Hill Parking
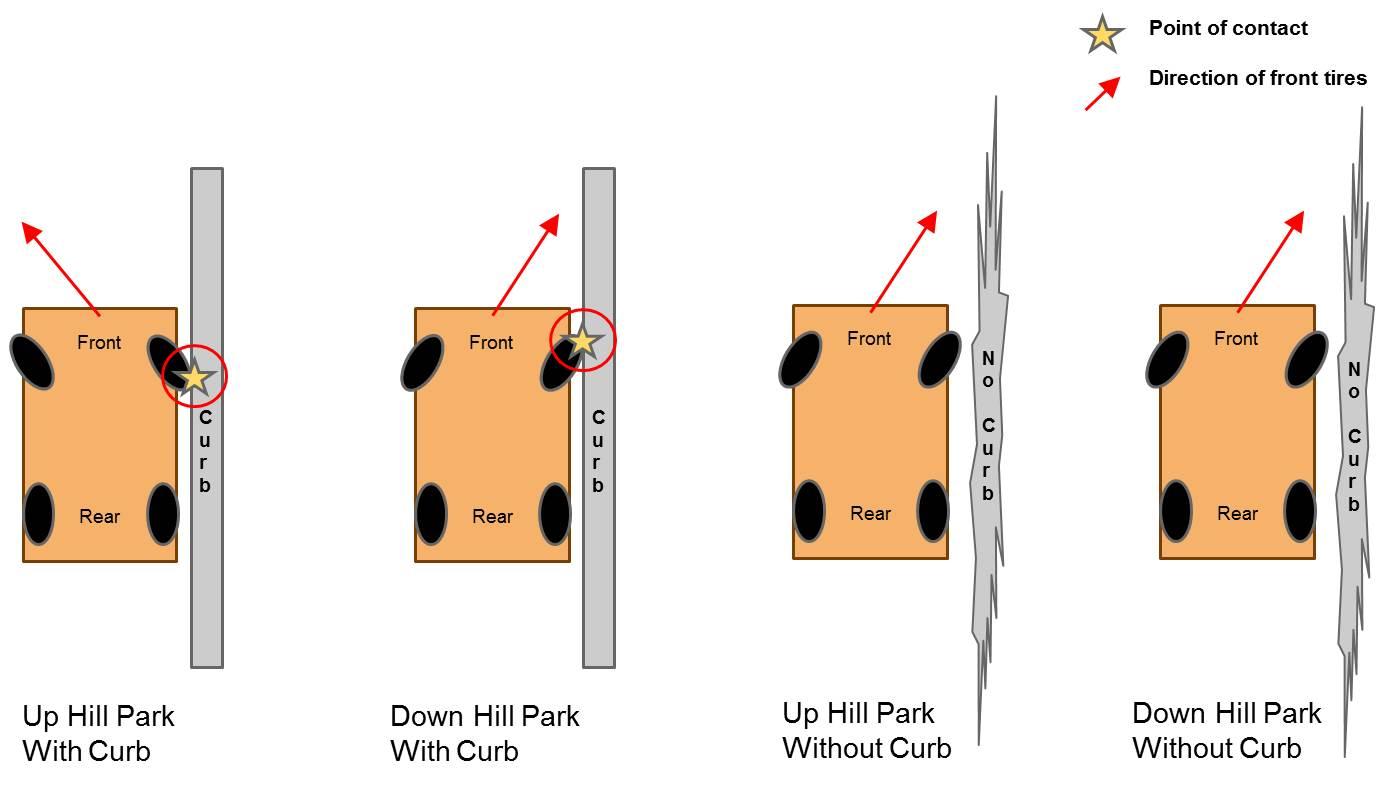
Parking Uphill with a Curb
-
Visual checks – mirrors.
-
Signal right, pull over to the curb (6” – foot) and stop.
-
Shift to neutral and let the vehicle roll slowly.
-
Begin turning the wheels away from curb (to the left).
-
Allow car to roll so right front wheel touches curb and stop.
-
Set the parking brake and shift to Park.
Leaving Uphill Parking with a Curb - Standard procedure for leaving the curb
-
Right foot on brake.
-
Release parking brake.
-
Shift to “D”.
-
Signal to the left (communicating with others).
-
Check mirrors (rearview & side).
-
Check over left shoulder (blind spot).
-
Release brake, accelerate into proper lane and cancel signal.
Parking Downhill with a Curb
-
Visual checks – mirror.
-
Signal right, pull over to the curb (6” – foot) and stop.
-
Shift to neutral and let the vehicle roll slowly.
-
Turn wheels toward the curb (to the right).
-
Allow right front wheel to TOUCH the curb and stop.
-
Set the parking brake and shift to Park.
Leaving Downhill with a Curb
-
Set the parking brake and shift to Park.
-
Shift to Reverse.
-
Release the parking brake.
-
Back up just enough to “free” right front wheel from the curb.
-
Turn wheels away from the curb and stop.
-
Shift to Drive.
-
Follow procedure for leaving the curb.
Parking Uphill without a Curb
-
Visual checks – mirrors.
-
Signal right, pull over to the curb (6” – foot) and stop.
-
Shift to neutral and turn the wheels to the right.
-
Set the parking brake and shift to Park.
Leaving Uphill Parking without a Curb - Standard procedure for leaving the curb
-
Right foot on brake.
-
Release parking brake.
-
Straighten the wheels (Turn wheels left).
-
Shift to “D”.
-
Signal to the left (communicating with others).
-
Check mirrors (rearview & side).
-
Check over left shoulder (blind spot).
-
Release brake, accelerate into proper lane and cancel signal.
Parking Downhill without a Curb
-
Visual checks – mirrors.
-
Signal right, pull over to the curb (6” – foot) and stop.
-
Shift to neutral and turn the wheels to the right.
-
Set the parking brake and shift to Park.
Leaving Downhill without a Curb
-
Right foot on brake.
-
Release parking brake.
-
Straighten the wheels (Turn wheels left).
-
Shift to “D”.
-
Signal to the left (communicating with others).
-
Check mirrors (rearview & side).
-
Check over left shoulder (blind spot).
-
Release brake, accelerate into proper lane and cancel signal.
3rd Behind the Wheel Lesson
Objectives
-
Review previous lessons.
-
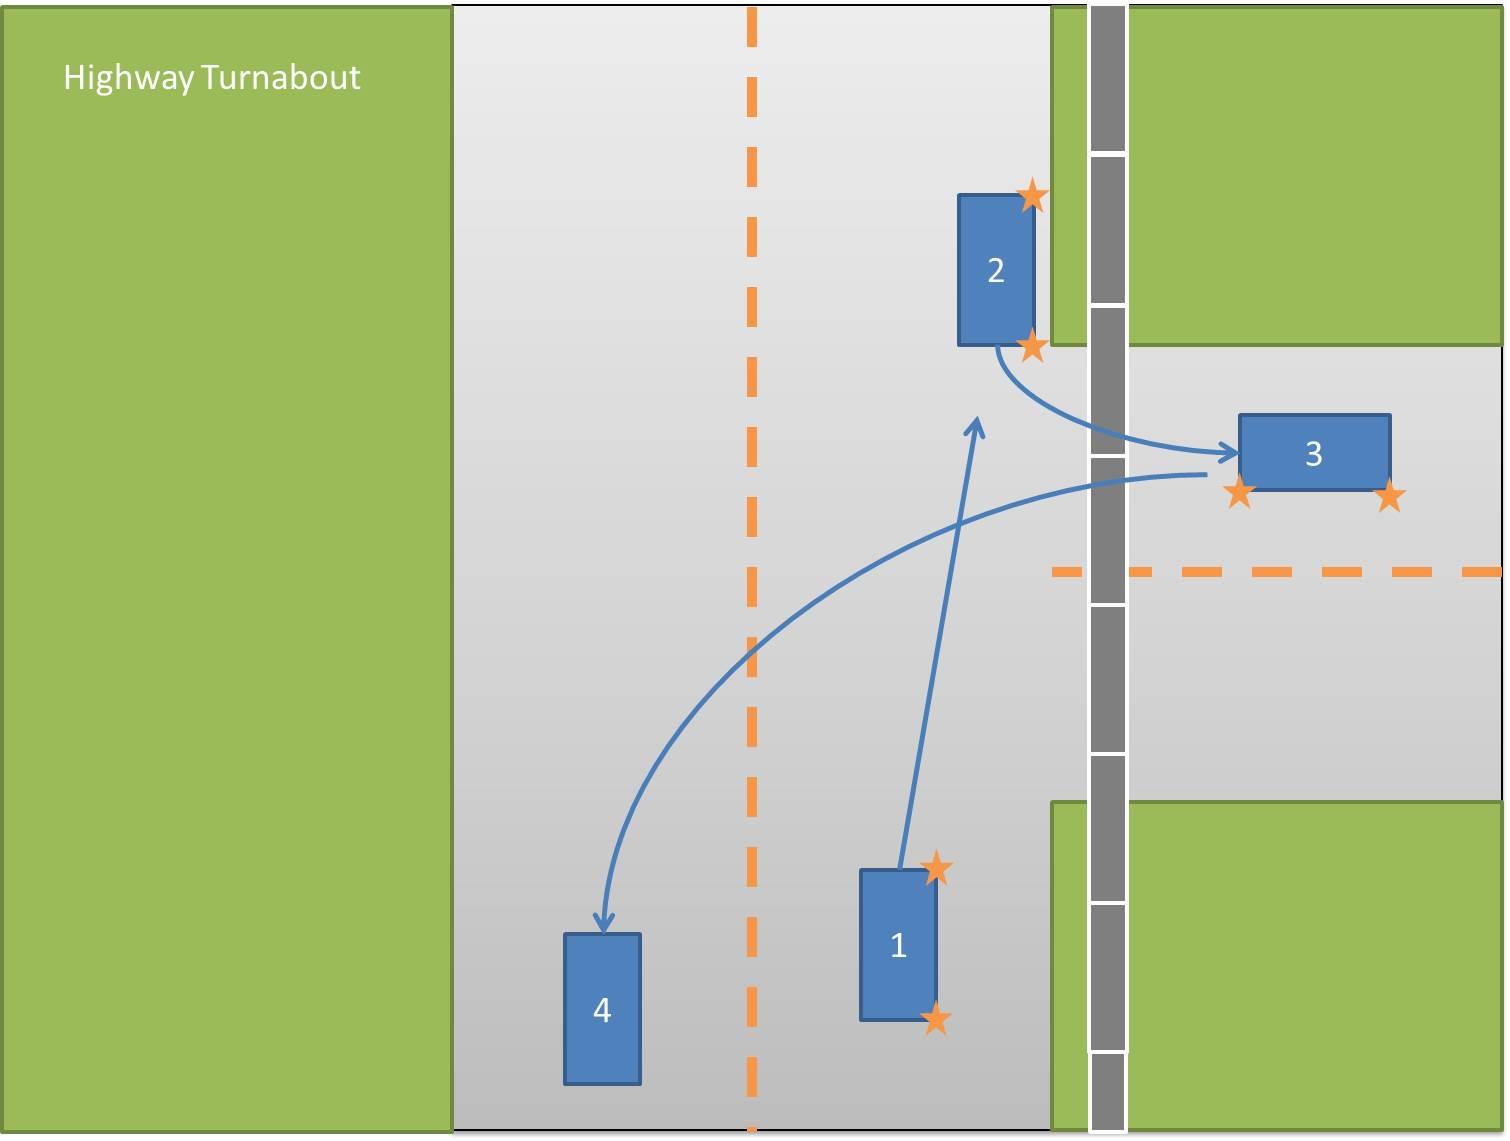
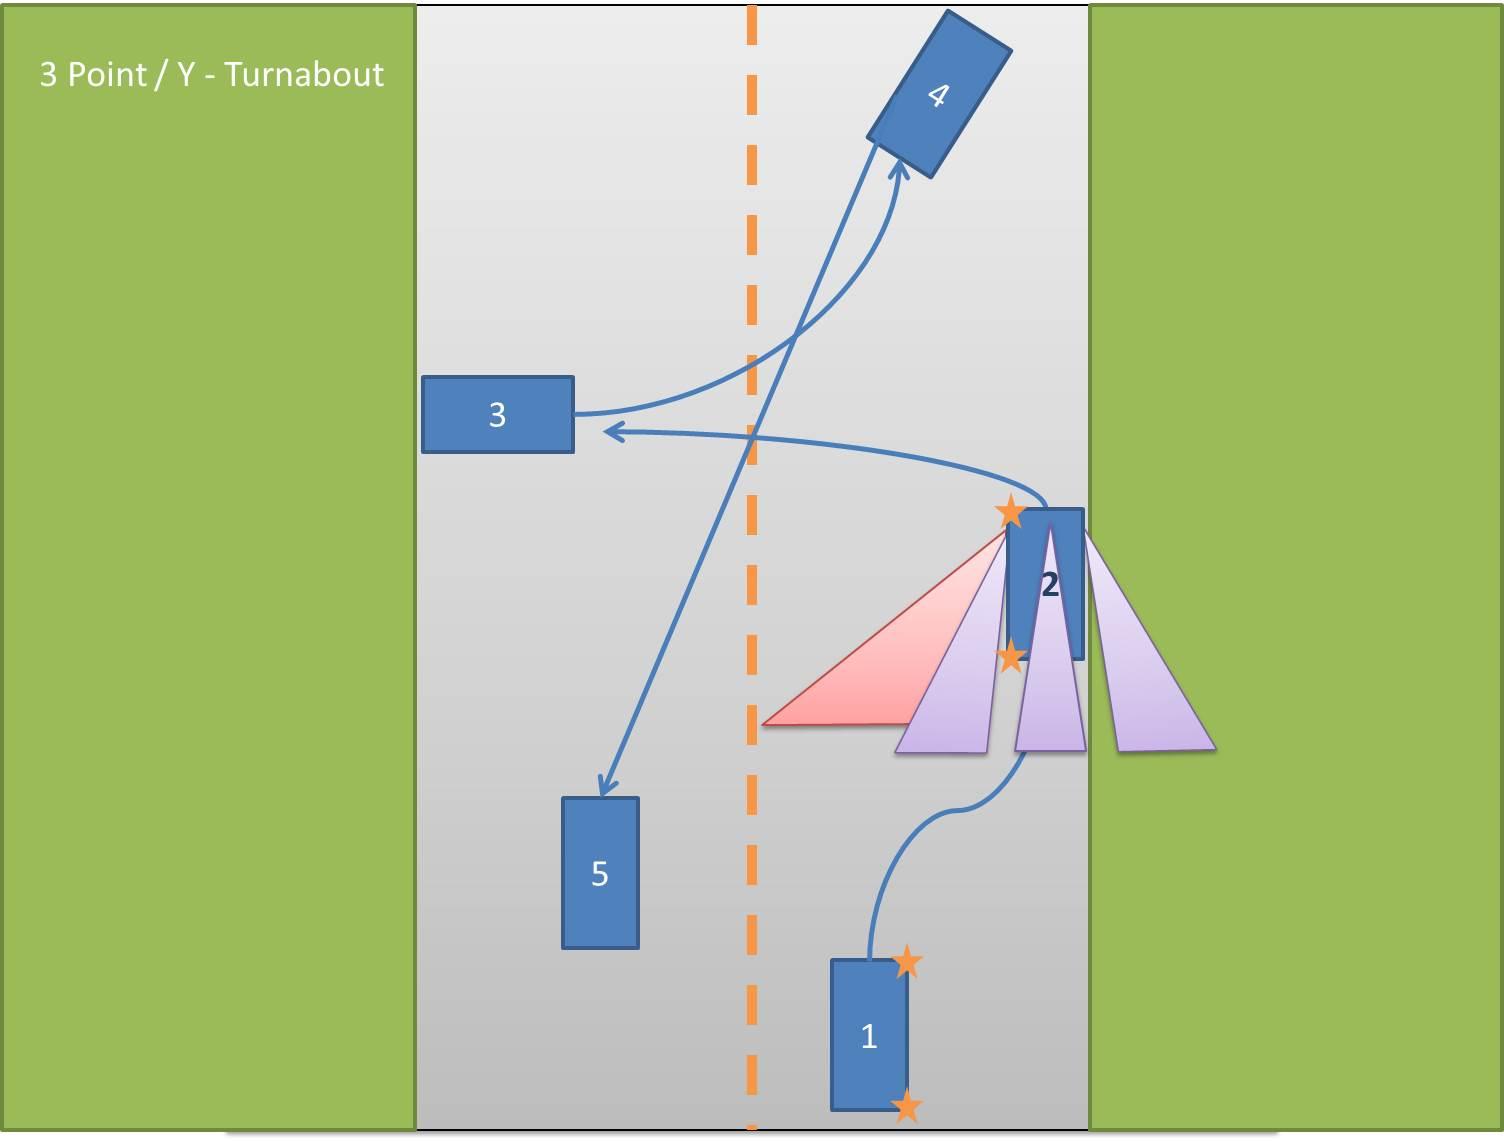
Driving skills to complete the 5 Turnabouts (turning your vehicle around).
|
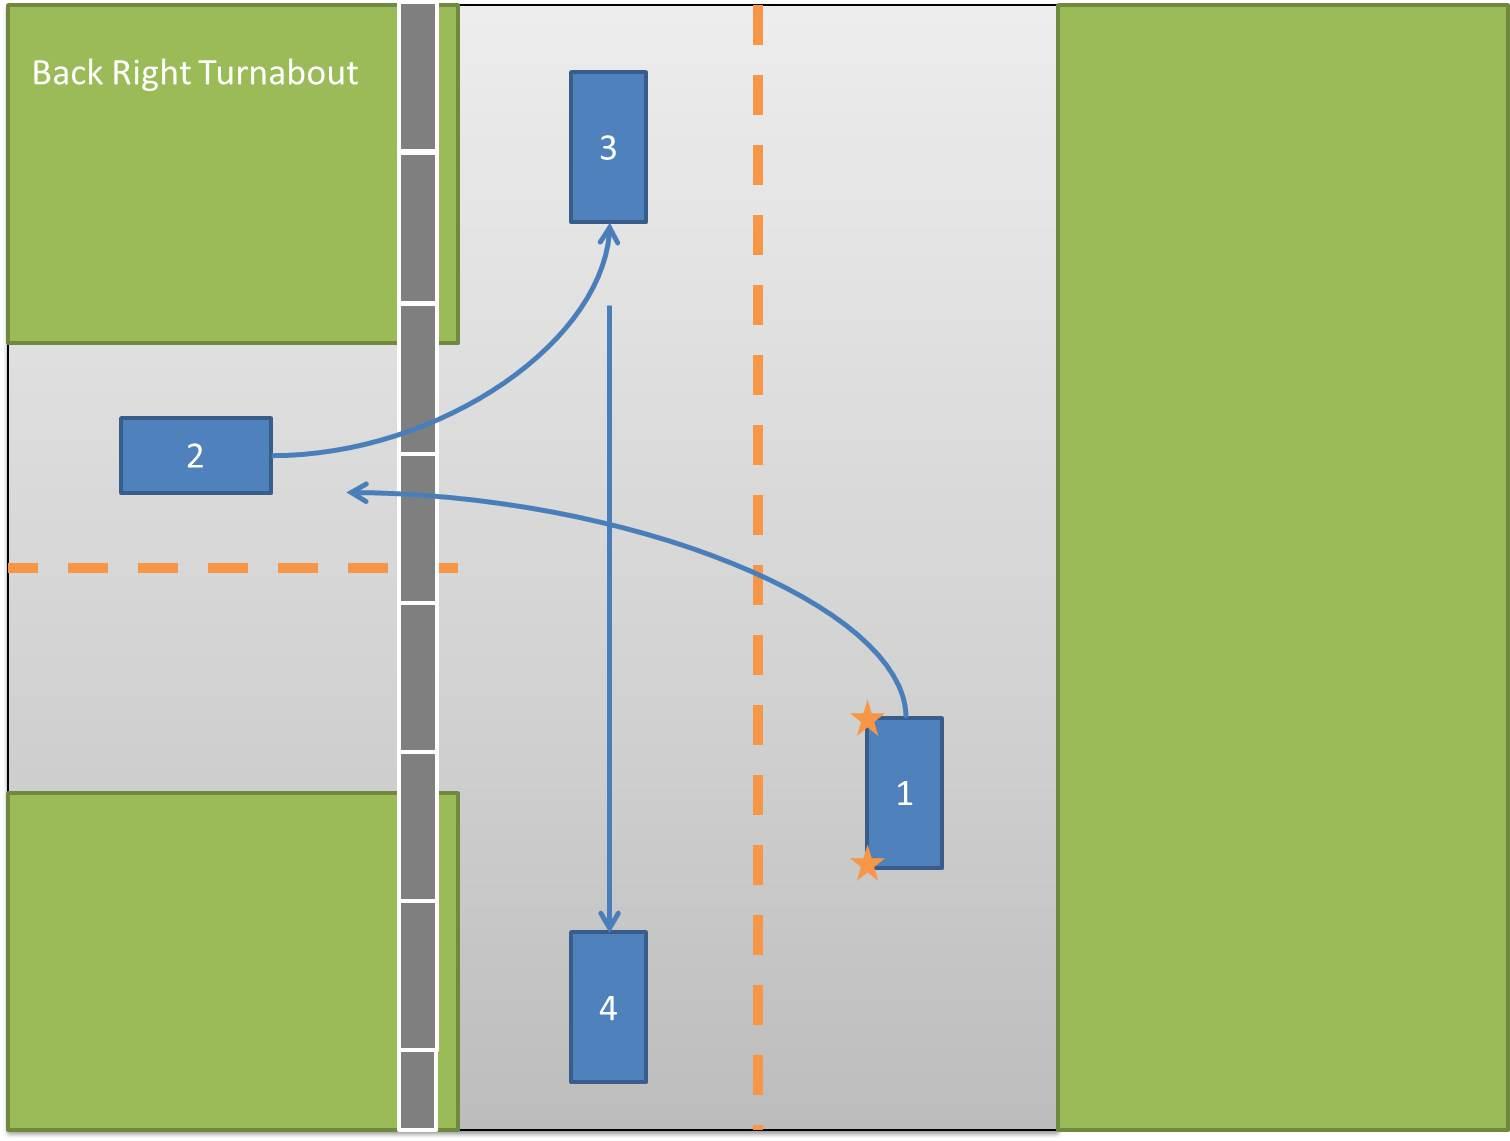
Backing to the Right Turnabout (Back Right)
|
|
|---|---|
|
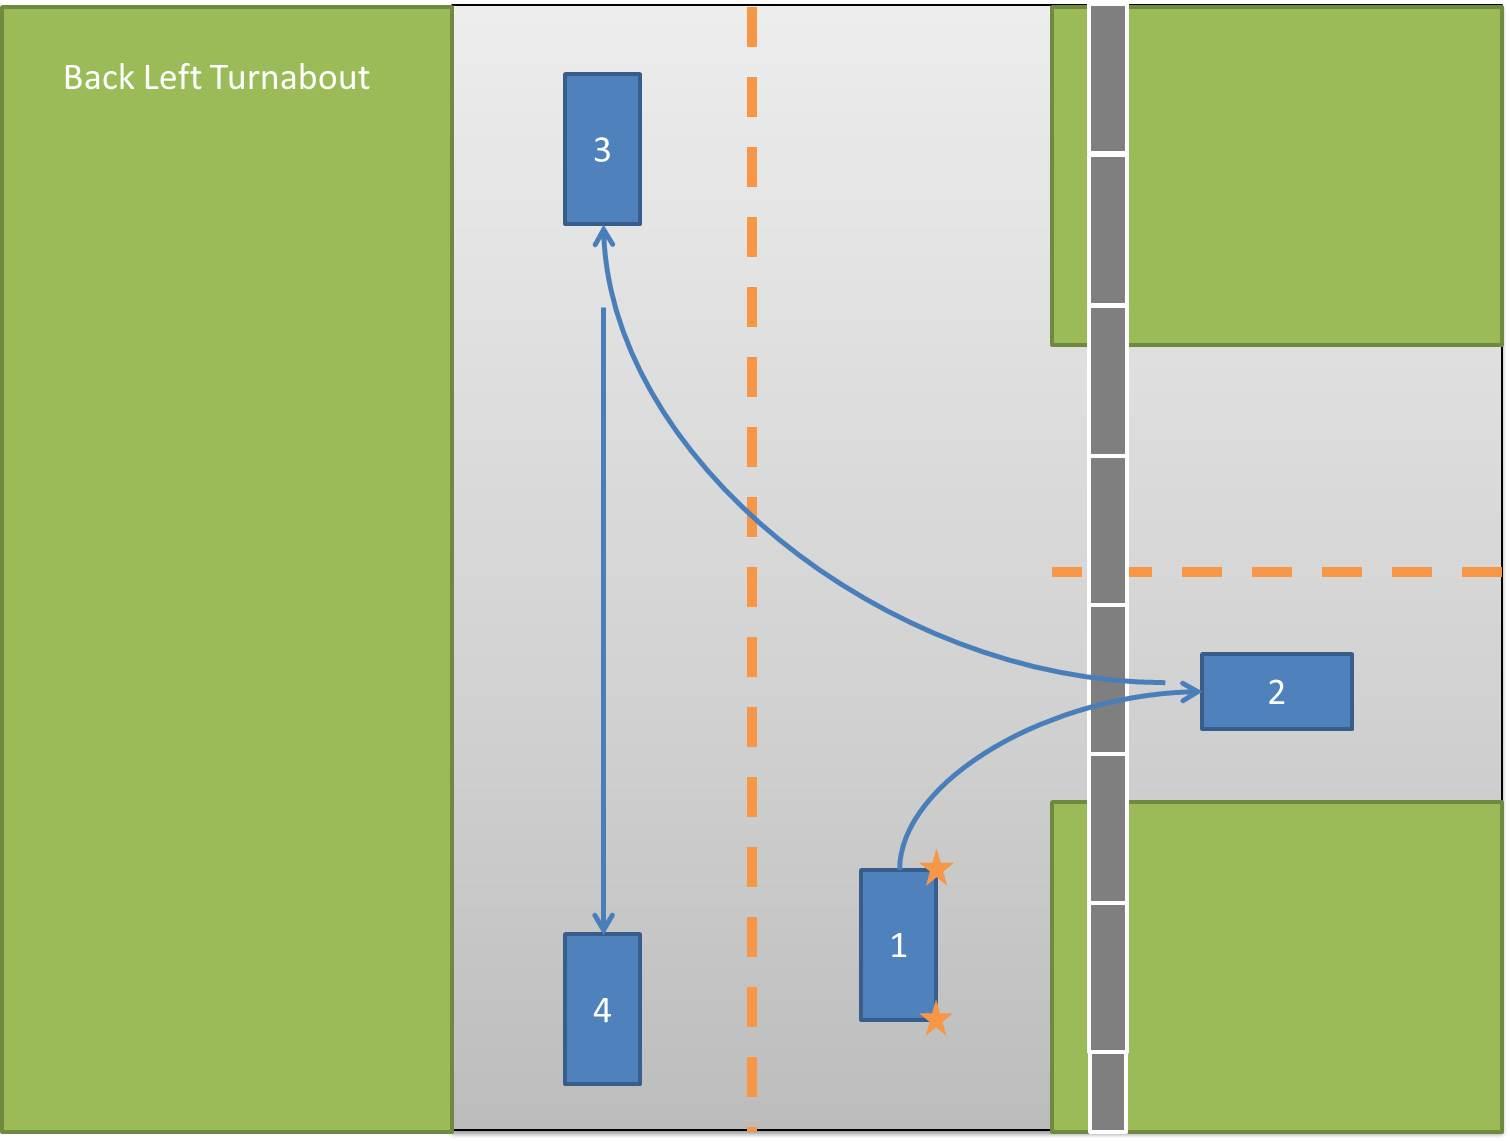
Backing to the Left Turnabout (Back Left)
|
|
|
Highway Turnabout
|
|
|
“U” Turn
|
|
|
3 Point or “Y” Turnabout (This Turnabout is usually done on a dead end street, when a driveway is unavailable).
|
|

4th Behind the Wheel Lesson
Objectives
-
Review previous lessons.
-
Students learn how to perform Parking Procedures
-
Angle/Diagonal Parking
-
Perpendicular Parking
-
Parallel Parking
-
Angle/Diagonal Parking
-
Visual checks - locate parking spot.
-
Signal your intention.
-
Stay as far to the opposite side as possible and go slowly.
-
Begin turning the steering wheel when you can see the side mirror on the far side of the vehicle you are parking beside.
-
Continue slowly and check the corners of your vehicle.
-
Center the front of the vehicle in the center of the parking space.
-
Straighten your wheels and stop.
Leaving Diagonal / Angled Parking
-
Shift to reverse and release brake.
-
Back straight up until your front bumper is even with the rear bumper of the car next to you on the right or left (The car opposite the direction you are about to turn the steering wheel).
-
Begin turning all the way in your chosen direction (hard right or left), straighten then stop.
-
Shift to drive and leave parking lot.

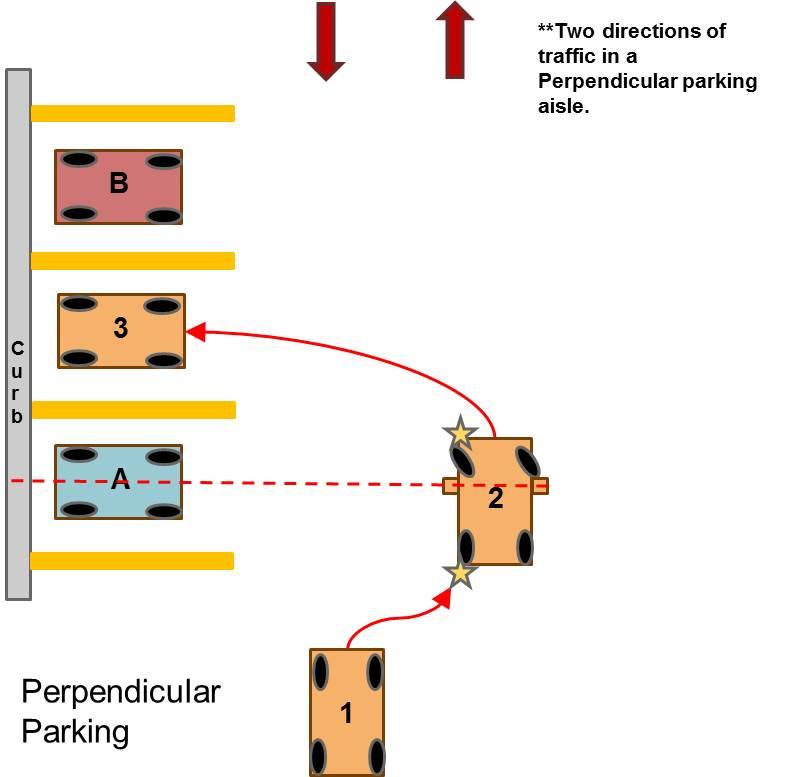
Perpendicular Parking
-
Visual checks - locate parking spot.
-
Signal your intention.
-
Pull over as far on the opposite side of your intended parking space.
-
Begin turning when your steering wheel/side mirrors are directly across from the middle of the space one (1) spot before your intended parking space.
-
Center car in space while continually check clearance on both sides and stop.
Leaving Perpendicular Parking
-
Shift to reverse and release brake.
-
Slowly back up while keeping your wheels straight.
-
Check traffic over both shoulders.
-
Once you have cleared your front bumper from the back bumper of the vehicles parked next to you and it’s clear, begin turning hard right or left.
-
Straighten Vehicle and stop.
-
Shift to drive and leave parking lot.
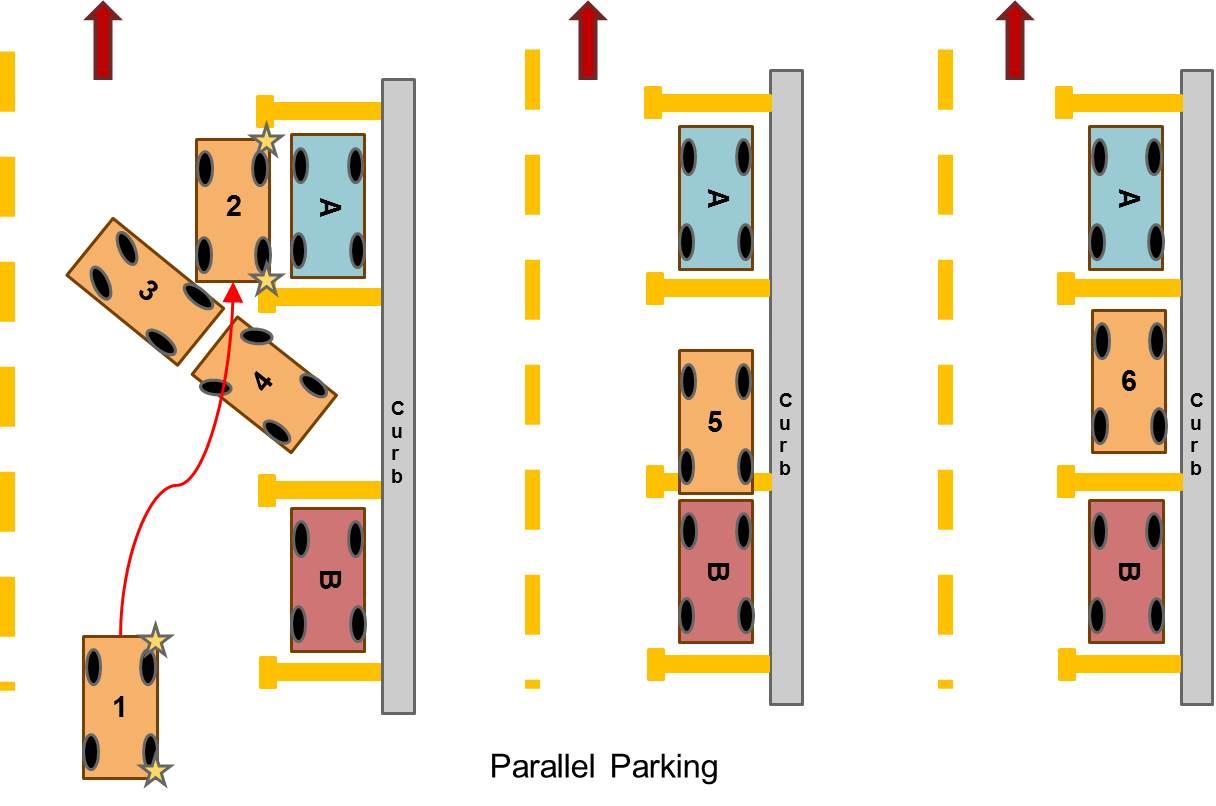
Parallel Parking
-
Visual checks - look for parking space and check your mirrors.
-
Signal your intention.
-
Pull up 2 feet away from car you are parking behind.
-
Rear bumpers should be even.
-
Shift to reverse.
-
Turn hard right to a 45 degree angle and stop.
-
Straighten wheels and back straight up.
-
When your front bumper is even with the rear bumper of the car in front, turn wheels left.
-
When car is parallel to the curb, straighten wheels and center the car.
Leaving Parallel Parking
-
Visual and mirror checks.
-
Back up until you are about 1 foot from the car behind you.
-
Use the standard procedures for leaving a curb and turn the wheel hard to clear the vehicle in front of you.
-
You must yield to traffic on the street.
5th Behind the Wheel Lesson
Objectives
-
Students will participate in a Driving Evaluation with their BTW teacher.
-
Students will be graded on how well they perform basic maneuvers and follow the teacher’s directions.
-
The evaluation will consist of all the previous lessons.
-
Students will immediately see how they performed and be given teacher feedback.
-
Students will bring the form home, show parents, sign and return to their teacher to students next BTW lesson.
6th Behind the Wheel Lesson
Objectives
-
Review previous lessons.
-
Students learn how to perform High Speed Lane Changing & Rural Driving.
High Speed Lane Changing
-
Make sure it’s legal and safe to perform.
-
Same as earlier lesson just at higher speeds.
-
Lane Changing
-
-
-
-
Check rear view and side “Mirrors” (is anyone coming up from behind).
-
Check your “Blind Spot” (direction you intend to move).
-
“Signal” your intention (communicate with vehicles behind).
-
“Drift” into proper lane (steering wheel should have slight movement).
-
“Cancel” signal when vehicle is halfway into the desired lane.
-
“Center” vehicle in correct lane (maintain legal speed).
-
-
Note: Students may have to accelerate or decelerate in order to make safe lane change.
-
Rural Driving
-
Speeds are typically higher, inadequate lighting can reduce visibility at night, trees and foliage can also restrict your path of travel.
-
Keep vehicle centered in your lane.
-
Keep a firm grip on the steering wheel.
-
Maintain posted speed limit (adjust for conditions).
-
Keep eyes moving (ahead, speedometer, ahead, mirrors, ahead…).
-
Watch for oncoming traffic.
7th Behind the Wheel Lesson
Objectives
-
Review previous lessons.
-
Students will drive to a Destination determined by student and teacher.
-
This lesson helps students learn and understand how to arrive at their final destination with minimal teacher interaction.
-
Students follow signs, road markings, traffic lights and other helpful ques in order to arrive safely.
-
Students will discuss and respond to some of the more common Emergency Situations.
Emergency Situations:
Brake Loss - Your vehicle is not responding to normal braking...
-
Pump the brakes immediately, if NO response.
-
Shift to a lower gear.
-
Step on emergency brake with left foot or pull lever with right hand.
-
On older vehicles...Pull or press and hold the emergency brake release while braking.
Panic Stopping - Stopping to avoid a collision WITH Anti-Lock Brakes (ABS).
-
Apply your brakes as firm as possible and let the anti-lock braking mechanism engage.
-
The brake pedal will pulsate when the ABS activates.
-
The driver will hear a “grinding” noise when the ABS activates.
-
Maintain constant pressure with the foot
-
Do NOT pump the brakes.
-
Panic Stopping - Stopping to avoid a collision WITHOUT Anti-Lock Brakes (ABS).
-
Apply your brakes as firm as possible without locking wheels.
-
You may need to pump your brakes in order to maintain steering control.
-
You can steer your vehicle by not locking the wheels.
Many accidents can be avoided or reduced in severity if the driver understands when they have control and when they do not have control of the vehicle. With a conventional braking system, when the brakes are applied hard enough to “lock” the wheels, the driver will “skid” and will be unable to control the direction of the vehicle. Only when the wheels are rolling can the driver steer the vehicle and change direction. With a conventional braking system, pumping the brakes or the use of “controlled braking” enables the driver to stop and maintain better directional control of the vehicle. This will allow the driver to keep the car centered in the driving lane.
Stalled Engine Procedure – Students will learn how to re-start the engine after it has stalled while driving. This situation can be extremely dangerous on high speed roads such as limited access highways, rural roads, congested highways and other places where you can’t stop easily.
-
Take your foot off the accelerator pedal.
-
Cover both pedals.
-
Shift to neutral - be careful not to shift to reverse or park.
-
Try re-starting the engine.
-
When your engine stalls, power is lost
-
Loss of power steering – steering becomes more difficult (especially at lower speeds)
-
Loss of power assisted braking – braking becomes more difficult.
-
-
When the engine starts, shift back to drive and continue driving.
-
If engine does not start pull to the right side of the road and activate the emergency flashers.
Braking Skid
-
As soon as the wheels lock, the car is in a braking skid.
-
The car will travel in the path of least resistance.
-
To correct this, the driver must release pressure from the brakes so the wheels roll.
-
Releasing the brake will allow the driver to steer and regain control of the car.
Power Skid
-
A power skid is the result of too much acceleration.
-
To correct a power skid, the driver must reduce the pressure on the accelerator.
-
Drivers are prone to power skid on a slippery surface.
8th Behind the Wheel Lesson (objectives)
-
Review previous lessons.
-
Students will learn how to Merge, Drive and Exit on the Expressway.
Merging on the Expressway
-
Check traffic conditions when you enter the entrance ramp.
-
Adjust your speed to match other vehicles; make sure the vehicle ahead of you has enough distance to eliminate problems for you.
-
Start looking for a gap in traffic that you can accelerate into. Use side mirror and quick glances over left shoulder.
-
As you approach the acceleration lane, signal and accelerate quickly.
-
Check to be sure the gap you chose is still available; if it is, be sure your speed has reached the speed of traffic already on the expressway.
-
Drift into the space, cancel signal and establish a safe following distance.
-
Maintain the legal speed limit.
Driving on the Expressway
-
Stay in the proper lane (Right lane for merging, exiting and slower traffic, Middle lane(s) for extended travel and left lane(s) for passing, faster traffic and emergency vehicles.
-
Maintain proper space cushions between you and the vehicles around you, when possible.
-
Stay at or near the legal speed limit (depending on conditions).
-
Make constant visual checks.
-
If driving for distance you should adjust hand position to 8 and 4 (more relaxed position).
-
Stay alert, keep scanning, and be safe.
Exiting the Expressway
-
Make constant visual checks.
-
Locate your exit early.
-
Position your vehicle in the right lane (most exits are on the right).
-
Signal your intention to exit.
-
Take foot off the accelerator and begin slowing.
-
Slowly drift into the exit lane and slow to ramp speed.
-
Adjust speed according to traffic.
9th Behind the Wheel Lesson
Objectives
-
Students will have a driving review that will cover any and all of the procedures that have been taught throughout the semester. This is the students’ last drive before they take the state’s (CDTP) Co-operative Driver Testing Program. Students will have the opportunity to review for this road exam.
-
Students will be able to work with the instructor on anything they wish to practice.
10th Behind the Wheel Lesson
Objectives
-
Students will take the (CDTP) Co-operative Driver Testing Program.
-
All students will be given one opportunity to take the State Driving Road Test with us.
ADDITIONAL SAFETY INFORMATION
Blowout
Very serious! If a front tire blows, the car will want to pull sharply in the direction of the blowout. A blowout in the rear will cause the car to “fish tail” so do NOT regard it as a skid. Take these steps if you have a tire blowout.
-
Stay off the brake
-
Firm grip on the steering wheel.
-
Ease off the accelerator
-
At a low speed, guide the car to a SAFE location.
-
Brake lightly only at low speed.
Jump Starting a Vehicle
There are several ways to start a car with a discharged battery, recharging the battery by the “slow charge” method. This is the best and only way to completely recharge the battery. Recharging the battery by the “quick charge” method will charge the battery faster but not completely. Jump starting will get you back on the road the fastest. Jump starting requires several precautions during the hook up between the two batteries.
-
Both batteries will normally be installed in vehicles
-
The vehicles should NOT be touching at any point.
-
Be sure that the ignition key and all accessories in the vehicle with the dead battery have been turned off.
-
Connect the positive terminals of both batteries with a booster cable - the terminals will be marked with a (+).
-
Connect the other booster cable to the negative (-) terminal of the good battery and to an engine bolt head or other non-painted “ground point” on the vehicle being started.
-
Do not connect near any moving parts in the engine and keep at least 12 inches from the battery.
-
Once the cables are connected hold the accelerator at approx. 2000 rpm for 30 seconds before attempting to start the dead vehicle.
-
Never connect the negative booster cable to the negative terminal of a dead battery - a spark created at the connection could ignite explosive gases, which linger around the battery cap vent holes for that same reason, it makes sense not to smoke near a battery.
-
Another safety tip is to avoid disconnecting a live circuit at the battery terminals because it may cause sparking.
Changing a Tire
Before changing a tire, check the instructions, which can be found in the owner’s manual either inside the front lid, or in the spare tire compartment. There are different types of jack and wrench combinations for changing tires. These basic steps should be followed when changing a tire.
-
Park car on level spot away from traffic. Set the gear selector in park; a standard transmission should be placed in reverse.
-
Set the parking brake and block the wheel diagonally opposite the flat with a brick or block of wood.
-
Get all passengers out of car.
-
Take out the spare before jacking up the car.
-
Remove hubcap and loosen each lug nut.
-
Continue to jack car until flat tire clears the ground. Don’t get so close to the car that it could fall on an arm or leg. Bumper jacks can be unstable.
-
Remove lug nuts and place them in the hubcap, then remove the flat tire.
-
Mount the new tire and replace and tighten lug nuts.
-
Lower the car.
-
Replace hubcap.
-
Put tire changing equipment and flat tire in trunk. Remove blocks from under the tire.